
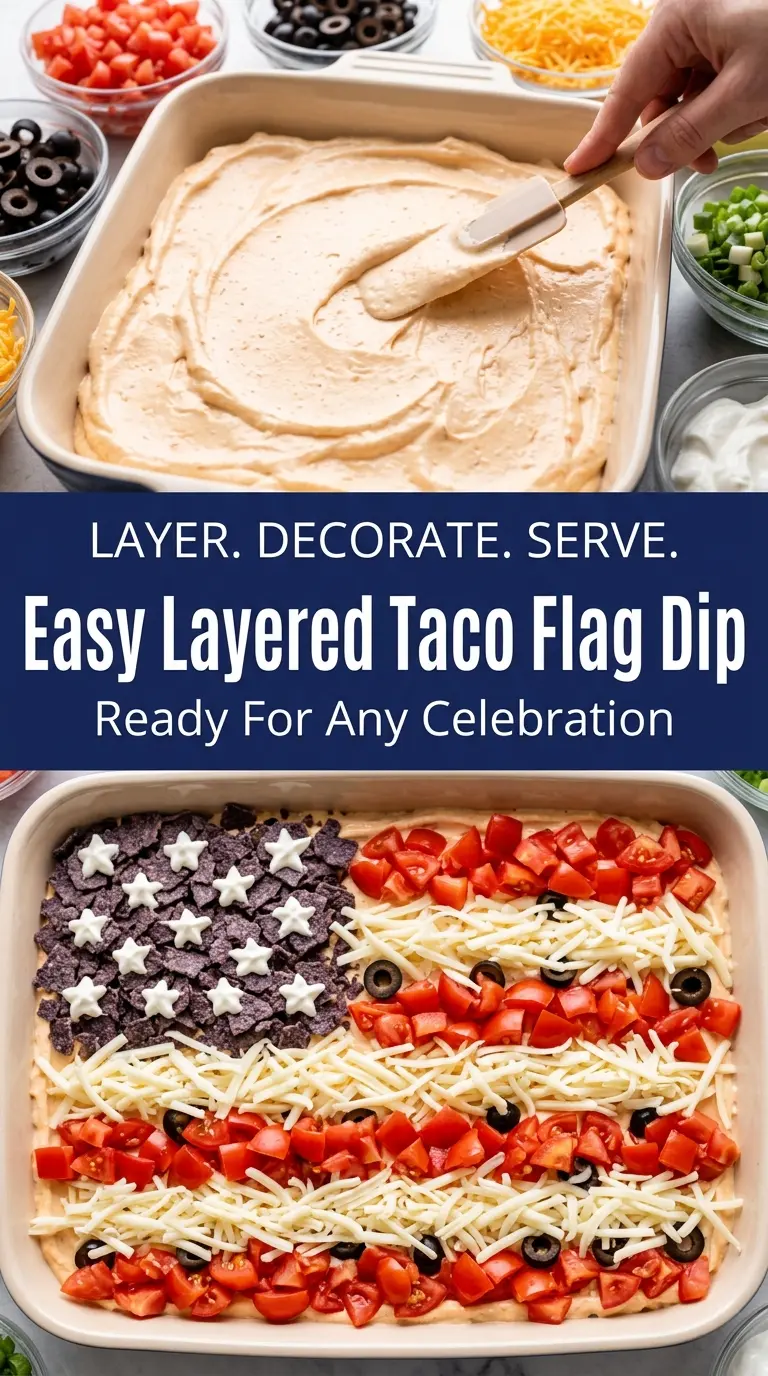
Creamy, salty, crunchy, and bright, this Easy Layered Taco Flag Dip disappears fast because every bite gives you a little of everything. The base stays spreadable instead of watery, the toppings stay crisp, and the flag design turns a simple taco dip into the kind of appetizer people crowd around before the chips are even on the table.
What makes this version work is the balance in the bottom layer. Cream cheese gives the dip body, sour cream loosens it just enough, and taco seasoning seasons the whole dish without needing a long ingredient list. The trick is to mix the base until it’s smooth before it goes into the dish, then keep the toppings dry and evenly chopped so the stripes hold their shape instead of sliding into each other.
You’ll find a simple way to build the flag pattern below, plus a few practical notes on substitutions, make-ahead timing, and how to keep the vegetables from watering down the surface. It’s the kind of party dip that looks impressive but comes together without any fuss.
The dip layer was thick enough to hold the flag design, and the tomatoes didn’t bleed into the cheese even after sitting out for an hour. I used it for our cookout and it was the first dish gone.
Save this taco flag dip for your next patriotic party spread when you want a chilled appetizer with clean stripes and bold taco flavor.
The Reason the Flag Layers Stay Sharp Instead of Blending Together
The flag look only works when each topping behaves differently on the platter. That means the base has to be thick enough to support the cheese, and the toppings have to be chopped small enough to sit where you put them. If the tomatoes are too juicy or the lettuce is wet, the colors bleed together and the design loses the clean striped effect that makes this dip stand out.
Another thing that trips people up is the serving dish. A shallow rectangle gives you enough surface area to build the flag without stacking the dip too high. If the layer is deep, the toppings slide. If it’s too thin, the base gets skimpy and the chips break through on the first scoop. You want a firm, even layer from edge to edge so every chip gets a little of everything.
What Each Ingredient Is Doing in This Taco Dip
- Cream cheese — This is the backbone of the dip. It gives the base enough structure to hold the toppings and keeps the texture rich. Let it soften all the way first or you’ll end up with small lumps that never fully smooth out.
- Sour cream — This loosens the cream cheese just enough to make the dip spreadable without turning it runny. Full-fat sour cream gives the cleanest texture, but plain Greek yogurt works if you want a tangier, slightly firmer base.
- Taco seasoning — This seasons the base evenly so every scoop tastes like taco dip, not just plain dairy with toppings. A packet is fine here, though if yours is salty, start with a little less and taste before spreading it into the dish.
- Cheddar cheese — The cheddar adds a sharp layer under the flag design and helps absorb a little surface moisture from the vegetables. Shred it yourself if you can; pre-shredded cheese is coated to keep it from clumping, and that coating can make the topping feel a bit dusty.
- Tomatoes, olives, lettuce, and bell pepper — These build the flag pattern, but they also bring freshness and contrast. Dice the tomatoes and bell pepper small so the rows sit neatly, and pat the tomatoes dry if they’re especially juicy.
- Queso fresco or Monterey Jack — Queso fresco gives a crumbly white stripe, while Monterey Jack melts into a softer, milder layer. For the cleanest visual contrast, keep this layer dry and use small crumbles or finely shredded cheese.
- Blue corn tortilla chips — These echo the blue section of the flag and make the whole platter feel intentional. They’re not just for looks; they’re sturdy enough to scoop through a thick dip without snapping right away.
Building the Layers Without Sinking the Design
Mix the Base Until It’s Smooth
Stir the softened cream cheese, sour cream, and taco seasoning until the mixture looks fully blended and airy, with no streaks of white left behind. A rubber spatula works, but a hand mixer makes the fastest path to a smooth base if the cream cheese is still a little stiff. If the base starts out lumpy, the flag layer on top will sit unevenly and the dip won’t spread cleanly in the dish.
Spread It in a Shallow Rectangle
Spoon the mixture into a rectangular serving dish and push it all the way to the corners so the surface is level. This matters because the topping pattern depends on a flat canvas. A domed middle makes the stripes drift, and you’ll lose that crisp, flag-like look as soon as the first chip goes in.
Place the Toppings in Clean Sections
Sprinkle the cheddar over the whole surface first, then build the blue corner with olives and add the white and red stripes in their own lanes. Keep the tomatoes and bell pepper dry and the lettuce fluffy, not packed down, so the colors stay distinct. If you press too hard, the toppings sink into the base and the flag starts looking muddy instead of neat.
Chill Before Serving
Thirty minutes in the refrigerator gives the base enough time to firm up and helps the layers settle. That short chill makes slicing and scooping easier, especially if the room is warm. Serve it cold with the blue corn chips right away, because this dip is at its best when the toppings stay crisp and the base holds its shape.
How to Adapt This Dip for Different Crowds
Dairy-Free Version
Use a sturdy dairy-free cream cheese and a thick unsweetened dairy-free yogurt in place of the sour cream. The texture will be a little softer, so chill it a bit longer before serving. The flag design still works, but you’ll want to keep the toppings extra dry so the surface doesn’t get slippery.
Gluten-Free Party Platter
The dip itself is naturally close to gluten-free, but check the taco seasoning packet because some blends use anti-caking additives or flavorings you may want to avoid. Serve with certified gluten-free tortilla chips or sturdy veggie dippers. The flavor stays exactly where it should be.
Milder, Kid-Friendly Version
Swap part of the cheddar for Monterey Jack and use a mild taco seasoning if your usual blend runs hot. You’ll lose a little sharpness, but the dip becomes easier for kids or guests who don’t love heat. Keep the tomato layer light so the top stays bright and easy to scoop.
Make It Ahead for a Crowd
Mix and spread the base a day ahead, then add the toppings closer to serving time. That keeps the vegetables fresher and prevents the flag colors from weeping into the cheese layer. If you need to assemble the whole dish early, wait to add the tomatoes until the last minute.

Easy Layered Taco Flag Dip
Ingredients
Method
- In a large bowl, mix cream cheese, sour cream, and taco seasoning until smooth. Scrape down the sides until no streaks remain.
- Spread mixture evenly into a rectangular serving dish. Level the top for clean, even layers.
- Sprinkle shredded cheddar cheese evenly over the top. Press lightly so the layer adheres.
- Create the flag's blue section using sliced black olives in the upper left corner. Arrange them so the area looks concentrated and distinct.
- Use queso fresco to create white stripes. Add it in horizontal bands across the center portion.
- Use diced tomatoes and red bell peppers to create red stripes. Spread them into parallel bands below and/or between the white stripes.
- Add shredded lettuce around the edges if desired. Leave the center layers exposed for a clear flag look.
- Chill for at least 30 minutes. Keep it refrigerated until the layers feel set when gently pressed.
- Serve with blue corn tortilla chips for serving. Arrange chips on the side so they stay crisp.