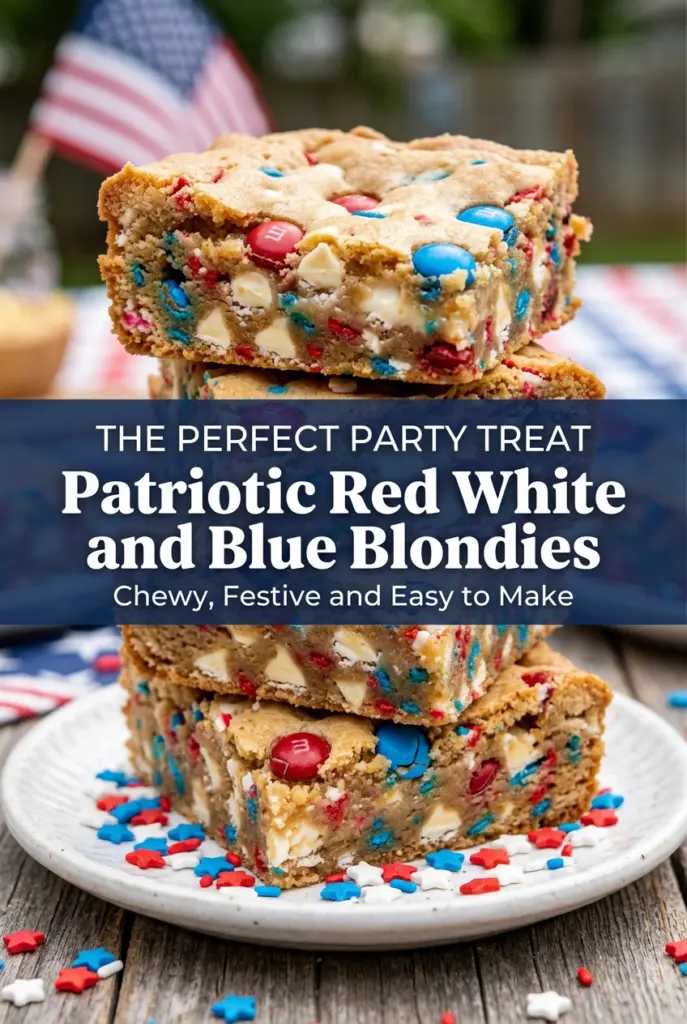
Soft, chewy blondies with crisp edges and pockets of melted white chocolate are one of those desserts people hover around before they’ve even cooled. The red, white, and blue candies give each square a festive look, but the real draw is the texture: dense enough to slice cleanly, tender enough to stay rich in the center, and sturdy enough to pack for a party without falling apart.
The trick here is treating the batter like a brownie base, not a cake. Melted butter and brown sugar give the blondies that deep butterscotch flavor and chewy middle, while just enough flour keeps them from turning bready. The candies and sprinkles go in at the end so they keep their color and don’t melt into muddy streaks in the oven.
Below you’ll find the small details that keep these blondies soft instead of dry, plus a few practical variations if you want to swap the mix-ins or make them fit what’s already in your pantry.
The edges baked up chewy and the center stayed soft for days. I used extra sprinkles on top and the blondies came out looking bakery-perfect without tasting too sweet.
These red, white, and blue blondies are the kind of chewy party bars that disappear fast.
The Key to Chewy Blondies Is Stopping Before They Look Done
Blondies go wrong when people bake them until the center looks fully set in the pan. By the time they cool, that extra time in the oven leaves you with dry edges and a cakey middle instead of the dense, chewy texture you want. Pull them when the top looks set and lightly crackled, the edges are golden, and the center still has a slight softness when you nudge the pan.
Brown sugar and melted butter do most of the work here. Brown sugar keeps the crumb moist and gives the bars that deep caramel note, while melted butter helps create a fudgier bite than creamed butter ever could. The other thing that matters is not overmixing once the flour goes in. Stir just until the streaks disappear, then stop.
What Each Ingredient Is Actually Doing in These Blondies
- Unsalted butter — Melted butter is what gives these blondies their dense, chewy texture. Salted butter works in a pinch, but the flavor is harder to control, so I prefer unsalted and add the salt myself.
- Light brown sugar — This is the main source of moisture and caramel flavor. Dark brown sugar will work, but the bars will taste a little deeper and bake up a touch softer.
- Eggs — Eggs hold the blondies together and give the center enough structure to slice cleanly. Add them one at a time if the butter looks hot, because scorching the eggs can make the batter grainy.
- All-purpose flour — This gives the bars their shape without turning them stiff. Spoon and level it if you can; packing in too much flour is the fastest way to end up with dry blondies.
- White chocolate chips — These bring creamy sweetness and little pockets of melt throughout the bars. Chips hold their shape better than chopped white chocolate, which is useful if you want distinct bits in every square.
- Red, white, and blue candy-coated chocolates — These add color and a little crunch. Fold most of them in gently, then save a handful for the top so the finish looks festive after baking.
- Patriotic sprinkles — Sprinkles are mainly for the surface. They bake on top and make the bars look finished, but too many mixed into the batter can bleed color.
Building the Batter Without Losing the Chewy Center
Whisk the Butter and Brown Sugar First
Start with melted butter and brown sugar in a large bowl and whisk until the mixture looks glossy and thick. You’re not trying to whip air into it; you’re dissolving the sugar enough that the bars bake with a smooth, chewy crumb. If the butter is piping hot, let it cool for a minute before adding the eggs so the batter doesn’t turn scrambled.
Add the Eggs and Vanilla
Stir in the eggs and vanilla until the mixture looks uniform and slightly paler. The batter should still be loose at this point, and that’s normal. If you beat it hard for a long time, you’ll whip in too much air and the blondies can rise too quickly, then sink as they cool.
Fold in the Flour Just Until It Disappears
Add the flour, baking powder, and salt, then stir only until no dry streaks remain. The batter will get thick fast, and that’s what you want. Stop as soon as the flour is absorbed; overmixing here tightens the crumb and makes the blondies lose that soft middle.
Finish With the Candies and Bake to the Right Color
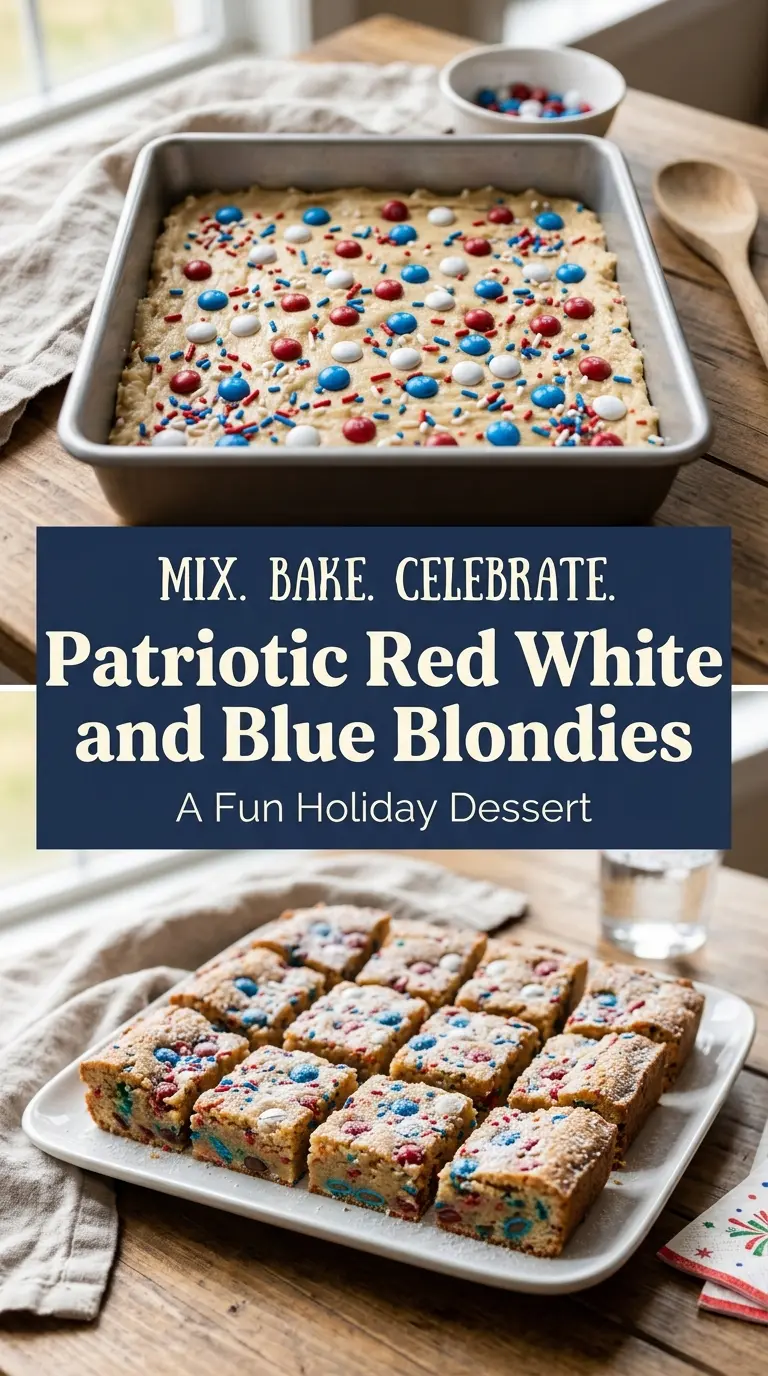
Fold in the white chocolate chips and candy-coated chocolates, then spread the batter evenly into the pan. Scatter a few more candies and the sprinkles over the top so the surface looks festive even after slicing. Bake just until the edges are set and lightly golden. The center should look slightly underdone when you pull it out, because it finishes setting as it cools.
How to Adapt These for Different Pans, Diets, and Candy Stashes
Make Them Gluten-Free
Use a good 1:1 gluten-free baking flour in place of the all-purpose flour. The texture will be a little more delicate, but the blondies still stay chewy if you don’t overbake them. Let them cool completely before cutting so the crumb has time to set.
Swap the Candy for Chocolate Chips
If you don’t have patriotic candy-coated chocolates, use extra white chocolate chips or a mix of white chocolate and chopped milk chocolate. You’ll lose the bold red and blue color, but the bars will still be rich and sweet with a softer, less crunchy bite.
Bake Them in an 8×8 Pan
For thicker blondies, use an 8×8-inch pan and extend the bake time a bit. The edges will be more dramatic and the center will stay softer, but watch the color closely because thick bars can go from underbaked to dry fast once the center firms up.
Storage and Reheating
- Refrigerator: Store in an airtight container for up to 5 days. The bars firm up a little in the fridge, but the texture stays pleasantly chewy.
- Freezer: These freeze well. Wrap individual squares tightly and freeze for up to 2 months, then thaw at room temperature.
- Reheating: Warm a square for 10 to 15 seconds in the microwave if you want the white chocolate soft again. Don’t overheat it, or the candies can get sticky and the blondie turns dry at the edges.
Answers to the Questions Worth Asking

Patriotic Red White and Blue Blondies
Ingredients
Equipment
Method
- Preheat the oven to 350°F (175°C). Set up the bakeware so the batter can go in right away.
- Line a 9x13-inch baking pan with parchment paper. Leave some overhang for easier lifting after baking.
- Whisk the melted unsalted butter and light brown sugar until smooth. Keep mixing until no sugar lumps remain.
- Add the large eggs and vanilla extract to the bowl. Stir until the mixture looks glossy and fully combined.
- Mix in the all-purpose flour, baking powder, and salt. Stir just until no dry streaks of flour remain.
- Fold in the white chocolate chips and the red, white, and blue candy-coated chocolates. Distribute them evenly through the batter.
- Spread the batter evenly into the prepared 9x13-inch pan. Use an offset spatula or spoon to level the top.
- Sprinkle additional red, white, and blue candy-coated chocolates and patriotic sprinkles on top. Make sure the surface is well covered for visible color.
- Bake at 350°F (175°C) for 25–30 minutes. Look for a set top with edges that lightly turn golden while the center stays soft.
- Cool completely before slicing. Letting them cool fully helps the squares set cleanly without crumbling.
- Cut into squares and serve. Plate them straight from the pan for the easiest presentation.