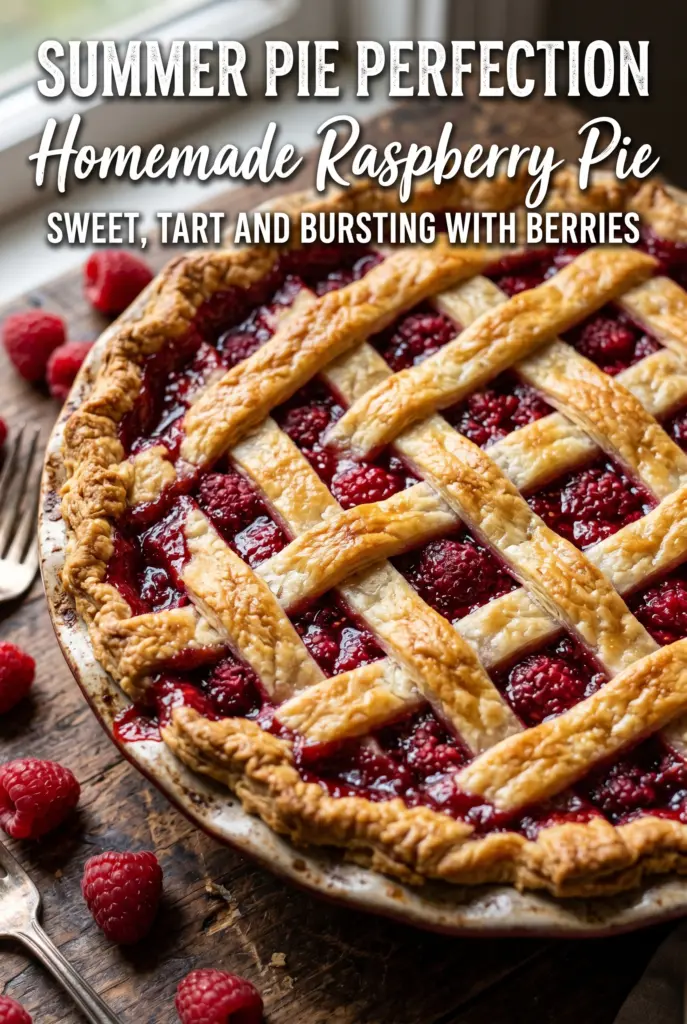
Flaky crust and a bubbling raspberry filling make this pie the kind of dessert people remember after the plates are cleared. The filling lands somewhere between jammy and fresh, with enough tartness to keep each slice from tasting heavy. A good raspberry pie should hold its shape without turning gummy, and this version gets there without a complicated list of thickeners or fussy steps.
The trick is simple: use enough cornstarch to set the juices, but not so much that the filling turns paste-like, and don’t rush the cooling time. Raspberries break down fast once they hit sugar, so the filling needs to go into the crust while it still has some structure. I also like a little lemon juice here because it sharpens the fruit instead of making the pie taste flat.
Below, you’ll find the exact baking cues that tell you the filling is done, plus a few variations if you want to use frozen berries or bake this with a lattice top. The details matter with berry pie, and once you know what to look for, it’s an easy one to get right.
The filling set up beautifully and stayed sliceable after cooling, which never happens with my berry pies. The crust stayed crisp on the bottom and the lemon really kept the raspberry flavor bright.
Love the jammy raspberry center and flaky crust? Save this homemade raspberry pie for the next time you want a fruit dessert that slices cleanly.
The Reason Raspberry Pie Turns Watery Before It Turns Beautiful
Raspberry pie goes sideways when the fruit releases too much juice before the crust has time to set it. That’s why the sugar and cornstarch need to be mixed with the berries before the filling hits the crust, not sprinkled over the top after the fact. If the berries sit too long, they’ll start weeping in the bowl and you’ll pour off flavor along with the liquid.
The other mistake is pulling the pie too early. You want the filling actively bubbling through the vents or lattice, not just warm in the middle. That bubbling is what tells you the cornstarch has reached the heat it needs to thicken properly. If the edges are golden but the center isn’t bubbling yet, keep going.
What Each Ingredient Is Doing in This Pie
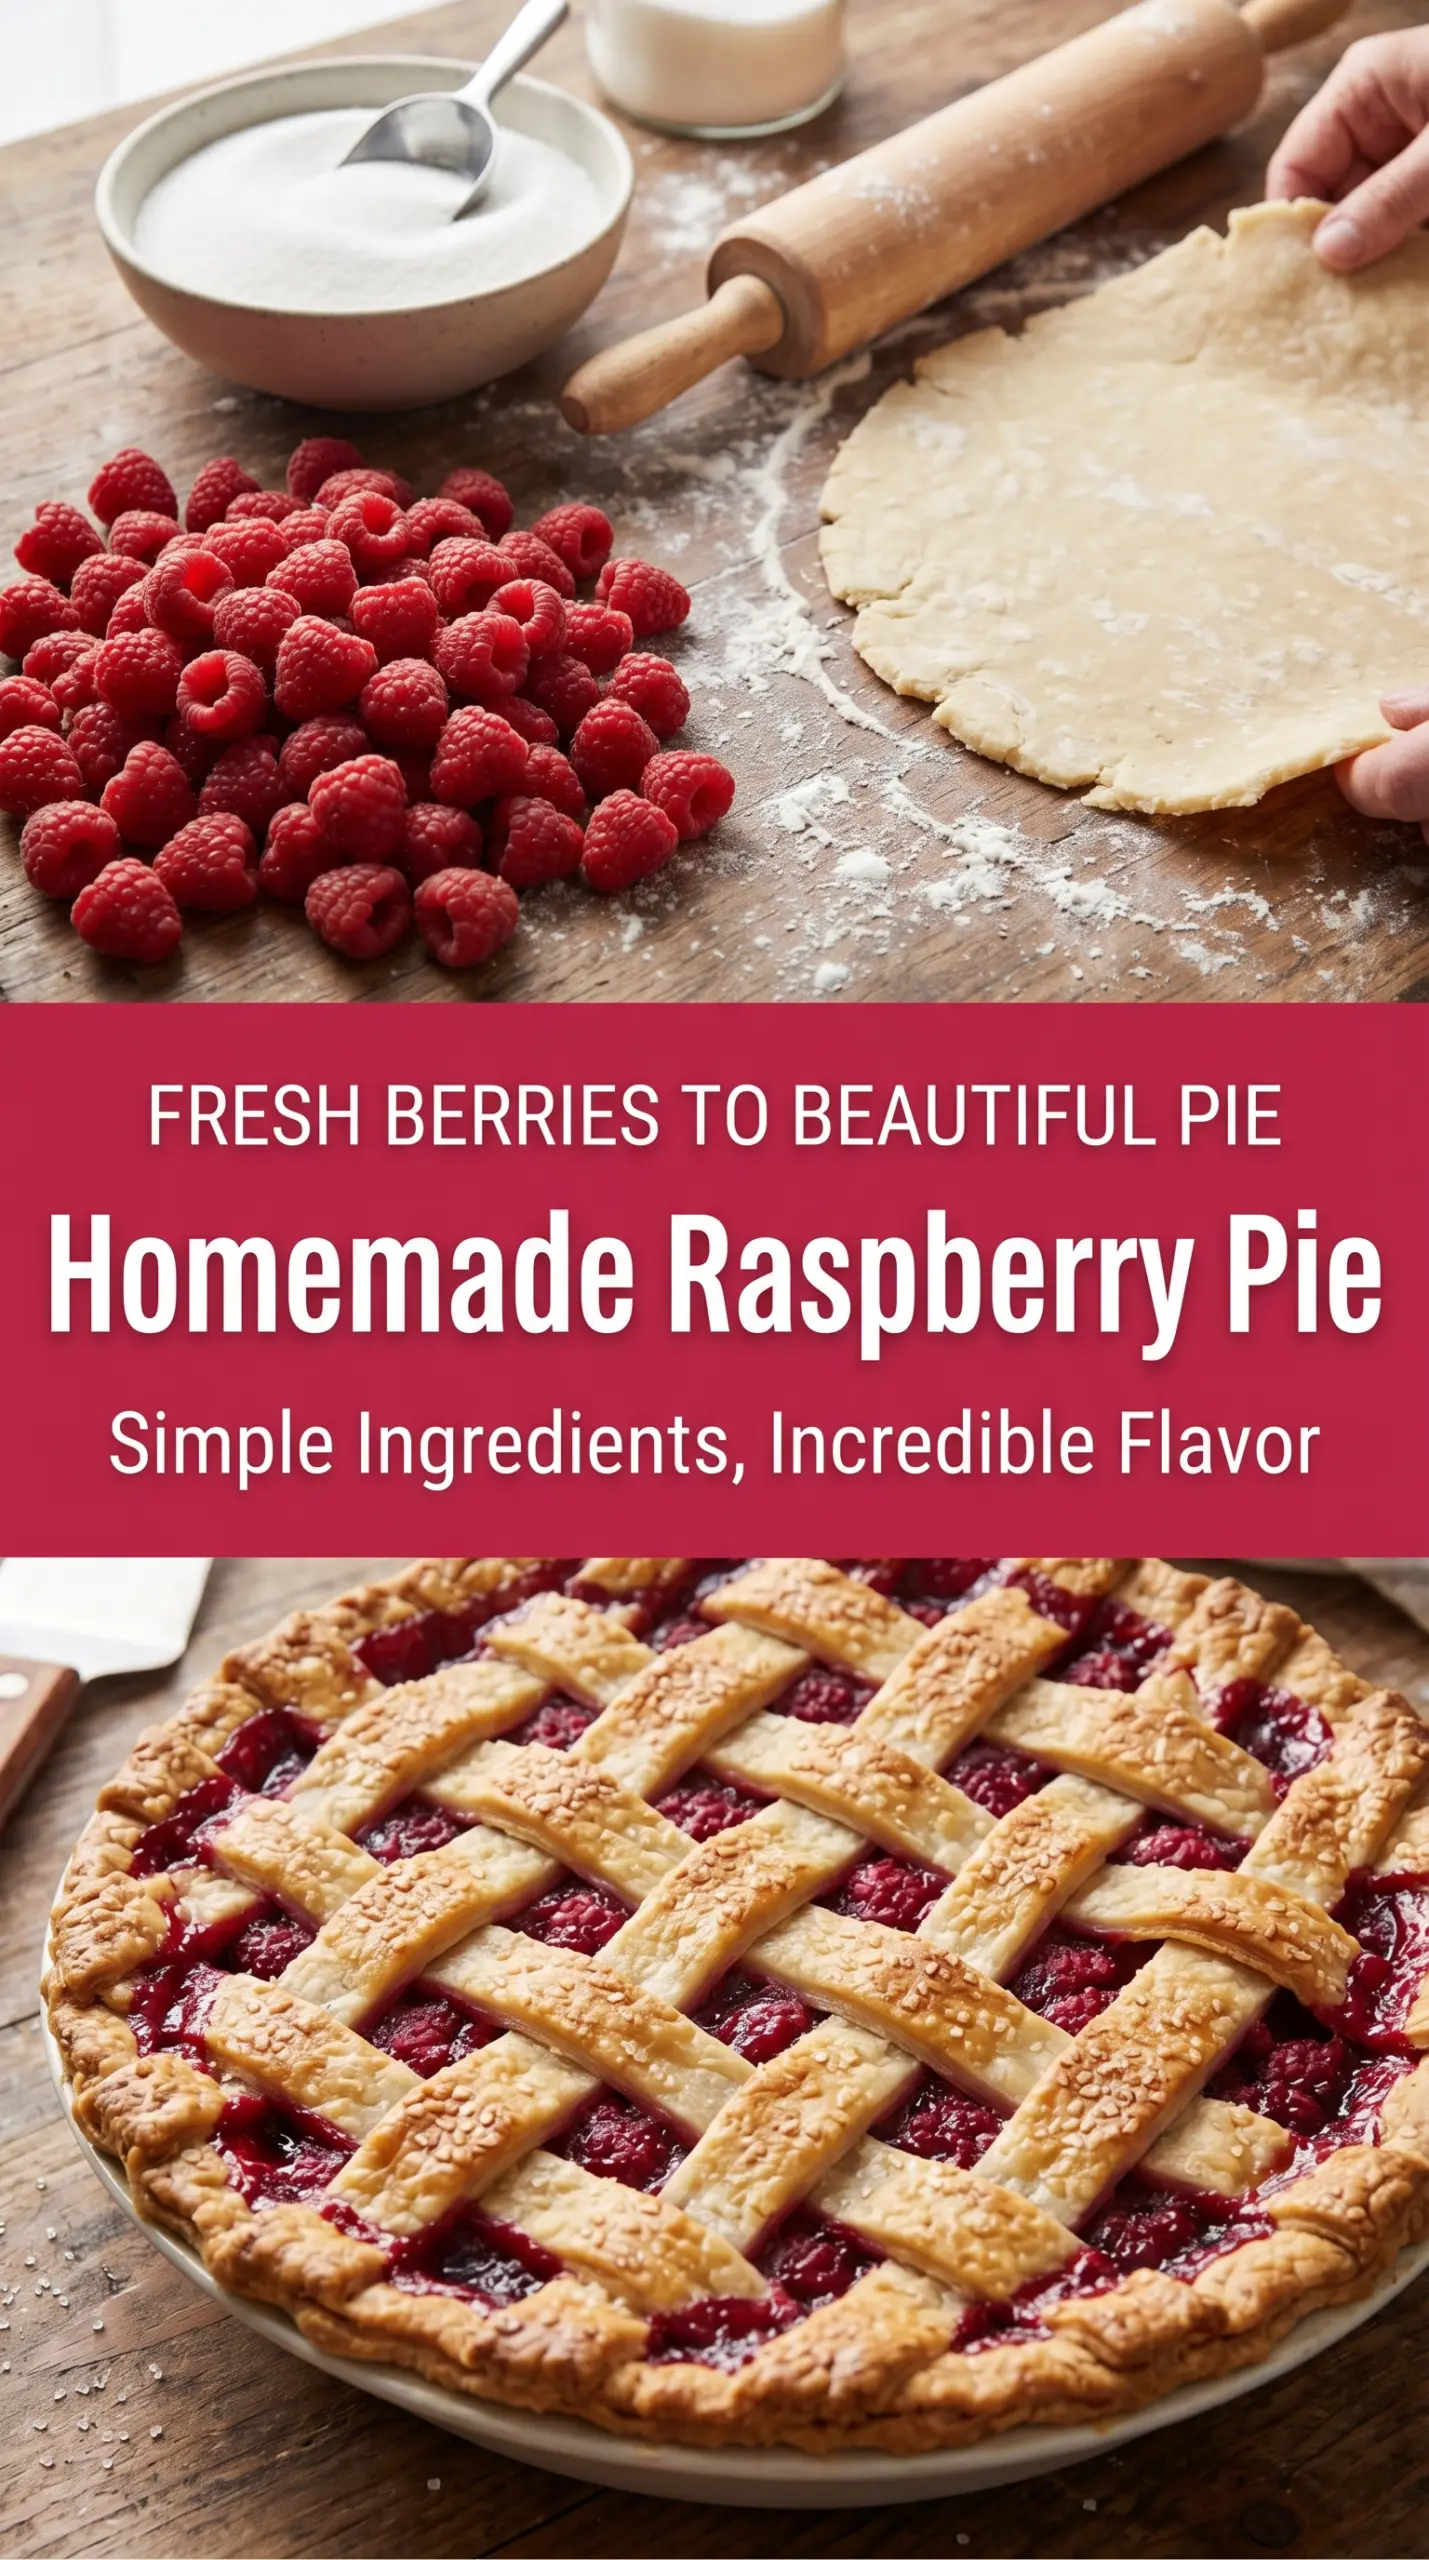
- Fresh raspberries — They’re the whole point of the pie, so use ripe berries that still hold their shape. Very soft berries will break down faster and can make the filling looser, though they still work if that’s what you have on hand. If you’re using frozen raspberries, keep them frozen until the last minute so they don’t flood the bowl.
- Cornstarch — This is what turns the juice into a sliceable filling. Flour won’t give you the same clean set here, and tapioca changes the texture more than most people want in a raspberry pie. If you like a softer filling, stay with the listed amount; if your berries are extra juicy, add another teaspoon.
- Lemon juice — It wakes up the berries and keeps the pie from tasting flat. You don’t need much, but leaving it out makes the filling taste sweeter and less focused. Bottled lemon juice works in a pinch, though fresh tastes brighter.
- Refrigerated pie crust — A good store-bought crust is fine here because the filling carries the flavor. If you use homemade crust, blind-baking isn’t necessary, but chilling the assembled pie before baking helps the bottom crust stay sturdier. Warm dough softens too quickly once the berries go in.
- Coarse sugar — This gives the top crust a little crunch and sparkle. It’s not essential, but it adds a nice finish that stands up to the juicy filling. Regular granulated sugar can work if that’s all you have, though it won’t look quite the same.
The Fill, Seal, and Bake Timing That Makes the Difference
Building the Filling
Gently toss the raspberries with sugar, cornstarch, lemon juice, vanilla, and salt until the berries are evenly coated. Don’t stir hard or you’ll crush the fruit before it goes into the crust. A few broken berries are fine; a bowl full of juice at this stage means the filling will leak before it has a chance to thicken in the oven.
Assembling the Crust
Roll the first crust into the pie plate and let it settle into the corners without stretching it. Stretching is what causes shrinkage later. Add the filling, then top with the second crust or a lattice, and crimp the edges firmly enough to seal but not so tight that steam can’t escape. If you’re using a full top crust, cut vents before it goes into the oven.
Baking Until the Center Bubbles
Start the pie at 400°F to help the crust set, then lower the temperature after 20 minutes so the top doesn’t over-brown before the filling is done. The pie is ready when the filling is bubbling in the center and the crust is deep golden. If the edges are coloring too quickly, cover them with foil while the center finishes thickening.
Cooling for a Clean Slice
This is the part people rush, and it’s the reason berry pies turn soupy on the plate. Cool the pie completely, then give it time to rest before slicing so the cornstarch can finish setting. If you cut it while it’s still warm, the filling will run even if the bake looked perfect.
How to Adapt This Pie for Frozen Berries, a Lattice Top, or a Lighter Filling
Using Frozen Raspberries
Frozen berries work well, but they release more liquid than fresh ones. Keep them frozen until you mix the filling, and expect to add a few extra minutes to the bake time if the pie goes in cold. If the berries are very icy, a teaspoon more cornstarch helps keep the center from turning loose.
Making a Lattice Top
A lattice top lets steam escape better than a full crust, which helps berry filling set evenly. It also gives you a clearer view of the filling, so you can watch for active bubbling. Cut the strips cleanly and chill them briefly before weaving so they stay neat in the oven.
Making It Gluten-Free
Use a gluten-free pie crust that bakes up sturdy enough to support juicy fruit. The filling itself is naturally gluten-free, so the only real change is the crust. Chill the assembled pie before baking to help the bottom crust stay crisp.
Storage and Reheating
- Refrigerator: Store covered for up to 4 days. The crust softens a bit after day one, but the flavor stays good.
- Freezer: Freeze baked slices tightly wrapped for up to 2 months. A whole baked pie can be frozen too, though the crust won’t stay quite as crisp after thawing.
- Reheating: Warm slices in a 300°F oven until the filling loosens slightly and the crust re-crisps, about 10 to 15 minutes. The microwave softens the crust and makes the filling sloppy.
Answers to the Questions Worth Asking

Homemade Raspberry Pie
Ingredients
Equipment
Method
- Preheat oven to 400°F (200°C). Set a rack in the lower-middle position so the bottom crust browns evenly.
- Roll one pie crust into a 9-inch pie plate. Press gently into the corners and trim any overhang if needed.
- In a large bowl, gently combine fresh raspberries, granulated sugar, cornstarch, lemon juice, vanilla extract, and salt. Mix just until the raspberries are coated and the cornstarch looks evenly distributed.
- Pour the filling into the prepared crust. Spread it out evenly so the bake sets up uniformly.
- Place the second pie crust over the filling or create a lattice top. Trim and crimp the edges to seal and prevent leaks.
- Whisk together large egg and water. Brush the crust with the egg wash for a glossy golden finish.
- Sprinkle coarse sugar for topping over the crust. Cut vents if using a full top crust so steam can escape.
- Bake for 20 minutes at 400°F (200°C). Look for the crust to start turning golden at the edges while the filling begins to warm.
- Reduce oven temperature to 375°F (190°C) and continue baking for 30–35 minutes. Bake until the filling is bubbling through the vents and the crust is a deep golden brown.
- Cool completely before slicing to allow the filling to set. Wait until the pie is firm enough that the filling holds shape when cut.