
Crispy beef and cheese chimichangas hit that sweet spot between hand-held dinner and full-on comfort food. The tortilla bakes up deeply golden and crackly on the outside, while the center stays packed with seasoned beef, melted cheese, and just enough salsa to keep the filling juicy without turning soggy. It’s the kind of meal that disappears fast because every bite has crunch, melt, and a little heat.
What makes this version work is the balance in the filling. The beef gets browned first so it has real flavor, then the taco seasoning and a little water turn it into a saucy base that clings to the meat instead of drying out. The salsa goes in off the heat, which keeps the filling bold and thick instead of thin and runny. That matters because wet filling is the fastest way to split a tortilla or lose the crisp shell.
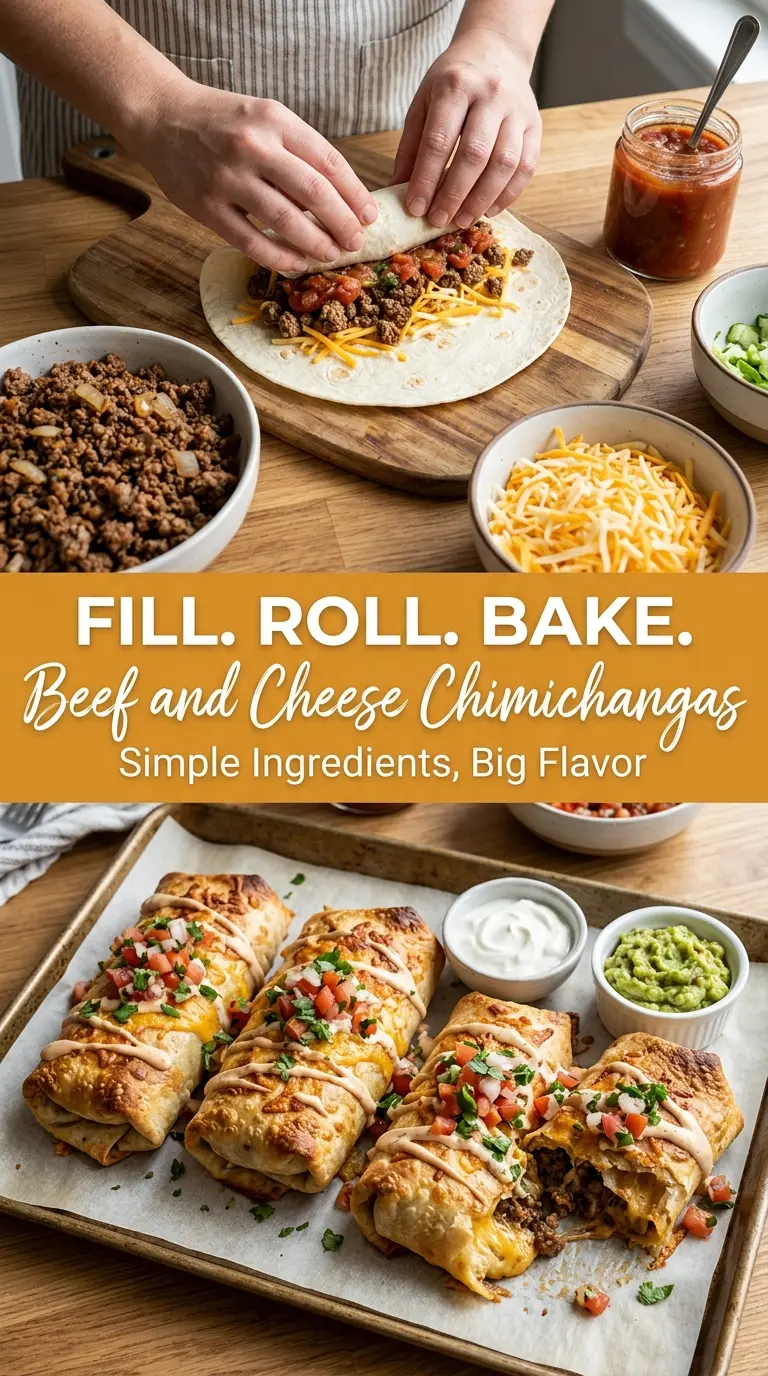
Below, I’ve laid out the best way to fold them so they stay closed, plus a few swaps for baking, air frying, and making them a little lighter without losing the good parts.
The filling held together beautifully and the tortillas got crisp all the way across, not just on the edges. I also liked that the cheese stayed gooey instead of disappearing into the beef.
Crispy beef and cheese chimichangas are the kind of dinner that vanish fast, so pin this one for a night when you want crunchy tortillas and a melty, savory filling.
The Tortilla Fold That Keeps Everything Inside
The biggest chimichanga mistake is overfilling the tortilla and hoping the seam will hold on its own. It won’t. You need a compact line of filling in the center, with enough room on the sides to fold in before you roll. That creates a sealed package that bakes evenly and gives you those neat, crisp edges instead of a burst-open mess on the pan.
Another thing that matters is how wet the filling is before it goes in the tortilla. The beef should be thick and spoonable, not soupy. If the mixture looks loose in the skillet, keep simmering until the extra liquid cooks off. A dry-looking filling sounds wrong, but for chimichangas it’s exactly what helps the tortilla crisp instead of steam.
What Each Ingredient Is Actually Doing in This Dish
- Lean ground beef — Lean beef keeps the filling rich without flooding the pan with grease. If you use a fattier blend, drain it well before adding the seasoning or the tortillas can get slick underneath.
- Onion and garlic — These build the savory base before the seasoning goes in. Dice the onion small so it softens fast and disappears into the filling instead of poking through the tortilla.
- Taco seasoning — This does the heavy lifting for flavor, but the packet needs a little water to bloom and coat the meat. If you’re using a homemade blend, don’t skip the simmer time or it can taste dusty instead of rounded.
- Salsa — Salsa gives the filling moisture and a little tang, but it also needs to be thick. Thin, watery salsa makes the filling messy, so use a spoonable one rather than a fresh pico-style mix.
- Cheddar and Monterey Jack — Cheddar brings sharpness while Monterey Jack melts smoothly, which keeps the filling creamy instead of greasy. If you swap in only one cheese, use a good melting cheese and grate it yourself for the best melt.
- Flour tortillas — Large flour tortillas are what make the fold possible. If they crack when you roll them, warm them for a few seconds first so they relax and don’t split at the seam.
Getting the Filling Hot, Tight, and Ready to Wrap
Browning the Beef First
Cook the beef and onion together over medium heat until the meat loses its pink color and the onion turns translucent and soft. If the pan starts pooling with grease, drain it before moving on; too much fat will keep the chimichangas from crisping cleanly. The beef should look crumbly and browned, not gray and wet.
Seasoning the Meat Without Drying It Out
Add the garlic for just 30 seconds, then stir in the taco seasoning and water. The mixture should bubble into a thick, glossy coating that clings to the meat. If it looks thin, keep simmering. If it looks dry before the spices have opened up, add a spoonful of water and give it another minute.
Cooling Before the Cheese Goes In
Pull the skillet off the heat before stirring in the salsa and cheese. That keeps the cheese from turning grainy and lets the filling hold together better when you spoon it onto the tortillas. Hot, loose filling is the main reason chimichangas split open in the oven, so give it a minute to settle into a thick mound before you start rolling.
Rolling and Baking for the Crisp Shell
Place the filling in a line just below the center of each tortilla, then fold in the sides and roll tightly. Put each chimichanga seam-side down on the baking sheet so gravity does half the work for you. Brush the tops with butter or oil, then bake until the tortillas are deep golden and feel crisp when tapped. Pale tortillas need a few more minutes; blond edges turn soft once they cool.
Three Ways to Adjust These Chimichangas Without Losing the Crunch
Air Fryer Chimichangas
Brush the folded tortillas with oil and air fry them until the shells are blistered and deeply crisp. The result is a little lighter than oven-baked chimichangas, with a shatterier shell, but you still need to keep the filling thick or the seams can open.
Gluten-Free Version
Use large gluten-free flour-style tortillas that are meant for rolling. Some gluten-free tortillas crack more easily, so warm them briefly before filling and don’t overstuff them. The texture will be a little less stretchy, but the filling still gives you the same savory, cheesy center.
Spicy Beef and Cheese Chimichangas
Add chopped jalapeños to the beef with the onion or stir in a spoonful of chipotle in adobo with the salsa. That pushes the filling from mild and savory into smoky heat without changing the structure of the recipe.
Storage and Reheating
- Refrigerator: Store leftovers in an airtight container for up to 3 days. The tortillas soften a bit, but the flavor stays great.
- Freezer: These freeze well after baking. Wrap each chimichanga tightly, freeze on a sheet pan, then move them to a freezer bag for up to 2 months.
- Reheating: Reheat in a 375°F oven or air fryer until the shell crisps back up. The mistake to avoid is microwaving them, which turns the tortilla chewy and soft instead of crisp.
Answers to the Questions Worth Asking

Beef and Cheese Chimichangas
Ingredients
Equipment
Method
- Preheat the oven to 400°F (200°C). Line a baking sheet and keep it ready for the rolled chimichangas.
- Cook the ground beef and diced onion in a skillet over medium heat until browned. Stir occasionally so the beef browns evenly.
- Drain excess grease from the skillet. Return it to the burner after draining.
- Add the minced garlic and cook for 30 seconds. Stir continuously to prevent burning.
- Stir in the taco seasoning and water. Keep stirring until the mixture looks evenly combined.
- Simmer for 3–4 minutes. Let the mixture thicken slightly, then remove the skillet from the heat.
- Stir in the salsa. Mix until the filling is fully sauced and cohesive.
- Place the beef mixture in the center of each flour tortilla. Use enough filling to mound slightly but avoid overfilling.
- Top the filling with shredded cheddar cheese and shredded Monterey Jack cheese. Distribute so cheese melts throughout each chimichanga.
- Fold in the sides and roll tightly into chimichangas. Press the seam gently so the tortilla holds during baking.
- Place the chimichangas seam-side down on the baking sheet. Arrange with space between them for even browning.
- Brush the chimichangas with melted butter or oil. Add a light, even coating for crisp edges.
- Bake for 20–25 minutes until golden and crispy. Serve hot as soon as they come out of the oven.
- Serve with sour cream, diced tomatoes, sliced green onions, fresh cilantro, and guacamole as desired. Add toppings right before eating for best texture.