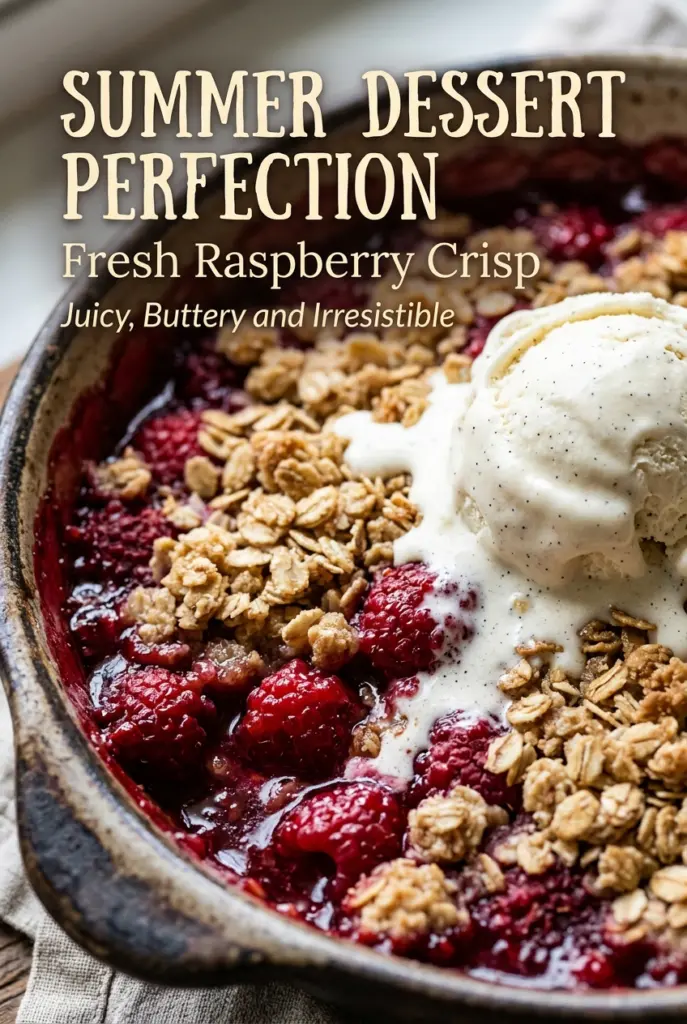
Juicy raspberries tucked under a buttery oat crumble are hard to beat when you want a dessert that tastes like you put in more work than you did. The filling turns glossy and jammy in the oven, while the topping bakes into crisp little nubs with toasted edges and a tender middle. Every spoonful gets a mix of sweet, tart, soft, and crunchy.
This version keeps the fruit front and center. A little cornstarch thickens the juices before they run all over the pan, and lemon juice sharpens the berries without making the dessert taste lemony. Melted butter also changes the topping in a good way: it clumps faster than softened butter, so you get those uneven craggy bits that bake up with the best texture.
Below, I’ll walk through the one baking mistake that turns crisps watery, the ingredient swaps that still hold up, and how to keep the topping crisp if you make it ahead.
The topping stayed crisp even after the raspberries bubbled up around the edges, and the lemon kept the filling from tasting flat. I used a little extra cornstarch because my berries were super juicy, and it set up beautifully after a short rest.
Love that jammy raspberry filling and crisp oat topping? Save this Fresh Raspberry Crisp for the next time you need a simple dessert that bakes up bubbly and golden.
The Small Mistake That Turns Raspberry Crisp Watery
The filling for a fruit crisp looks straightforward, but raspberries are generous with juice. If you skip the thickener or underbake the dessert, the fruit releases liquid faster than the topping can set it, and you end up with a loose pan of syrup instead of a spoonable filling. Corstarch solves that, but only after it gets hot enough in the oven to do its job.
That’s why the filling should go into the oven already tossed evenly with sugar, lemon juice, vanilla, and cornstarch. Uneven mixing leaves dry pockets of starch and thin spots that never set properly. The bake is finished when the edges are bubbling and the center has lost its raw, watery look. If the filling is only warm, it probably hasn’t thickened fully yet.
What Each Ingredient Is Doing in This Crisp
- Fresh raspberries — These break down into a soft, saucy filling with bright berry flavor. Frozen berries work in a pinch, but they release more liquid, so the filling needs an extra minute or two in the oven and a very full tablespoon of cornstarch.
- Cornstarch — This is what turns the berry juices from runny to glossy and spoonable. Flour can thicken fruit, but it clouds the filling and takes longer to cook through. If you want the cleanest set, keep the cornstarch.
- Old-fashioned rolled oats — They give the topping its crisp, nubby texture. Quick oats make a softer, sandier crumble, while steel-cut oats won’t soften enough in the bake. Rolled oats hit the balance best.
- Brown sugar — This adds molasses depth and helps the topping brown. Dark brown sugar makes the crumble taste a little richer; light brown sugar keeps it cleaner and brighter.
- Unsalted butter, melted — Melted butter coats the dry ingredients evenly and helps form those crunchy, irregular clumps. If you use softened butter instead, the topping will be more cookie-like and less craggy.
Building the Filling and Topping So They Bake at the Same Pace
Tossing the berries
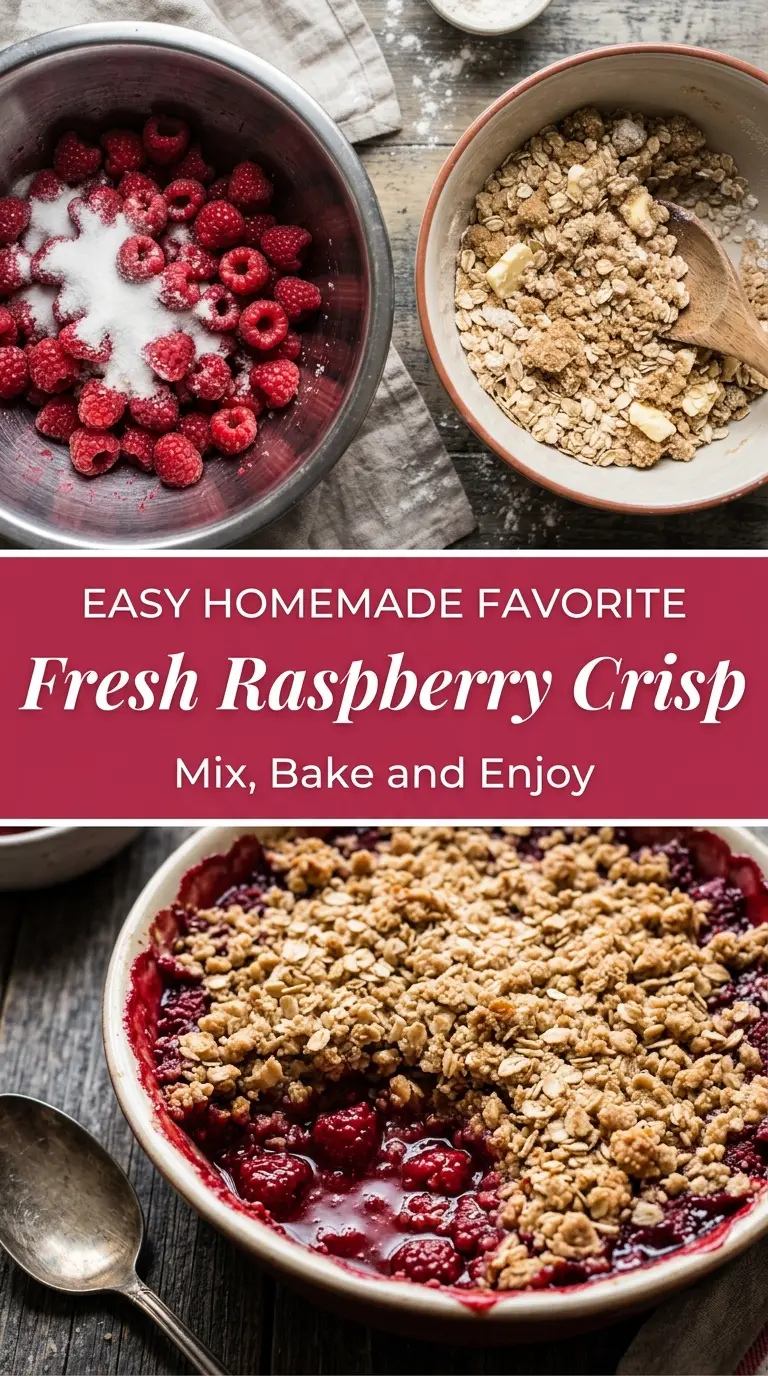
Combine the raspberries, sugar, cornstarch, lemon juice, and vanilla in a large bowl until every berry looks lightly coated. The starch has to be distributed before baking, because once the fruit starts to soften, it’s harder to mix without crushing it. Don’t leave dry white streaks in the bowl. Those turn into chalky spots in the finished crisp.
Making the crumble
Stir the oats, flour, brown sugar, cinnamon, and salt together first, then pour in the melted butter. Mix until the mixture looks like damp pebbles and clumps when squeezed in your hand. If it looks like wet sand, it usually needs a few more stirs. If it looks greasy, the butter was too hot and has started to soak the flour instead of coating it.
Baking until the center bubbles
Spread the topping evenly over the berries, then bake at 375°F until the top is deep golden and the fruit is bubbling around the edges and through the center. That bubbling is the sign that the cornstarch has activated. Pulling the crisp early leaves the filling thin, even if the topping already looks done. Let it rest for about 10 minutes before serving so the juices settle into a spoonable layer.
Three Ways to Adapt Fresh Raspberry Crisp Without Losing the Texture
Make it dairy-free
Use a plant-based butter that bakes well and has a similar fat content to regular butter. The topping will still brown and crisp, though the flavor will be a little less rich. Avoid margarine spreads with a high water content, since they can make the crumble soft.
Use frozen raspberries
Keep the berries frozen when they go into the bowl, and don’t thaw them first. Thawed berries leak too much liquid and can turn the filling thin. Add 1 extra tablespoon of cornstarch and bake until the center is visibly bubbling.
Swap in a mixed berry filling
Blueberries or blackberries can replace up to half the raspberries without changing the topping. The flavor gets deeper and less sharp, and the filling usually needs the same bake time. Keep some raspberries in the mix if you want that bright tart finish.
Make it gluten-free
Use a 1:1 gluten-free baking flour in place of the all-purpose flour and certified gluten-free oats. The texture stays crisp, though the crumble may be a little more delicate when you serve it warm. Let it cool longer if you want cleaner scoops.
Storage and Reheating
- Refrigerator: Store covered for up to 4 days. The topping softens as it sits, but the flavor stays good.
- Freezer: It freezes well after baking. Cool completely, wrap tightly, and freeze for up to 2 months. Thaw overnight in the refrigerator before reheating.
- Reheating: Warm individual portions in a 325°F oven until the berries are hot and the topping dries out a bit again. The microwave softens the crumble fast, so it’s the last choice if you want that crisp texture back.
Answers to the Questions Worth Asking

Fresh Raspberry Crisp
Ingredients
Equipment
Method
- Preheat the oven to 375°F (190°C). Place a sheet pan on the oven rack to catch drips for easier cleanup.
- Grease a 9-inch baking dish. This helps the raspberry filling release cleanly after baking.
- In a large bowl, combine raspberries, sugar, cornstarch, lemon juice, and vanilla. Stir until the berries look evenly coated with no dry cornstarch pockets.
- Transfer the raspberry mixture to the baking dish. Spread into an even layer so it bubbles consistently.
- In another bowl, mix oats, flour, brown sugar, cinnamon, and salt. Toss to distribute the spices throughout the crumble.
- Stir in melted butter until crumbly. The mixture should clump slightly when pressed.
- Sprinkle topping evenly over the raspberry mixture. Cover the surface completely so the berries cook through under the crumble.
- Bake for 35–40 minutes until golden brown and bubbly. You should see bubbling around the edges of the filling.
- Cool for 10 minutes before serving. The crisp topping will set slightly as it cools.
- Serve warm with vanilla ice cream if desired. Add fresh raspberries on top for extra berry brightness.