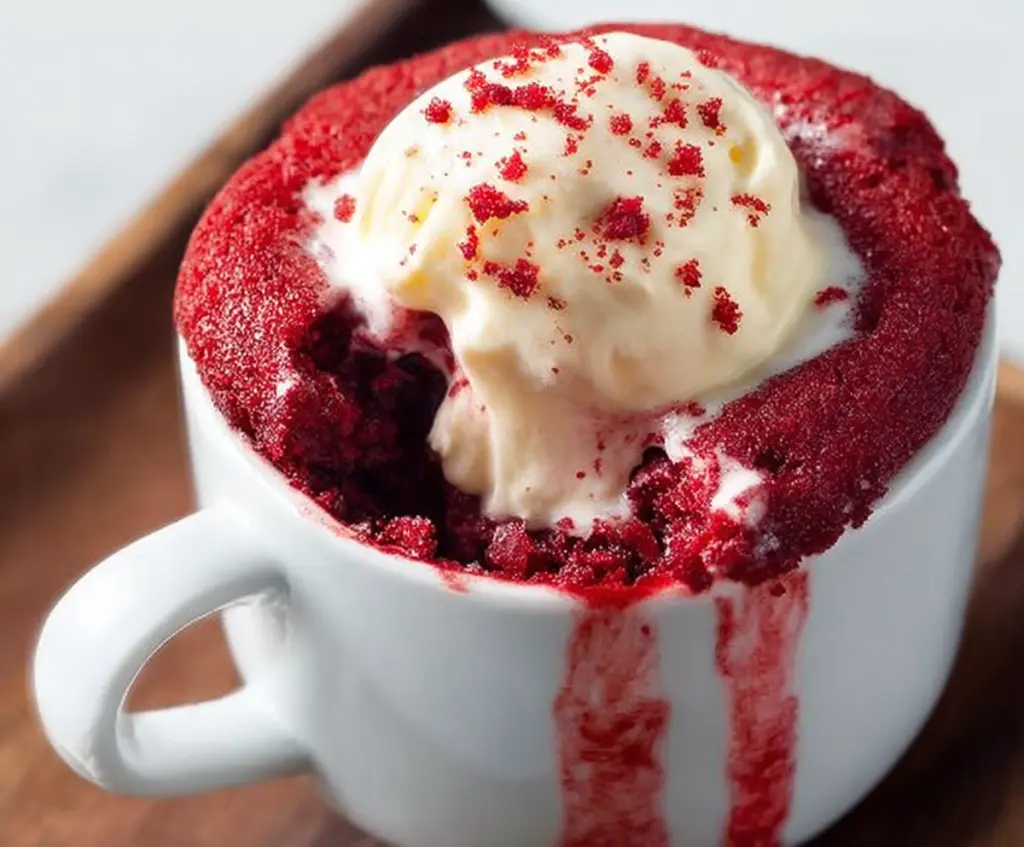
Red Velvet Mug Cake is like having a little piece of cake magic ready in just a few minutes! This single-serving treat is soft, moist, and packed with that classic red velvet flavor—think cocoa, a hint of vanilla, and that beautiful deep red color. Plus, it’s topped off with a creamy, tangy frosting that melts right into the warm cake.
I love making this mug cake when I want something sweet but don’t want to bake an entire cake. It’s quick and satisfying, and I’m always surprised at how something so simple tastes so rich and special. The best part? You can whip it up right in your mug and warm it up in the microwave, which means less fuss and more dessert in no time.
My favorite way to enjoy this mug cake is straight from the cup, spooning the frosting and cake together for the perfect bite. It’s a cozy little treat that feels like a hug after a long day. If you’re craving a dessert fix but want to keep things easy, this red velvet mug cake is the perfect answer.
Key Ingredients & Substitutions for Red Velvet Mug Cake
All-purpose flour: This is the base of your cake, giving it structure. If you want a gluten-free option, use a 1-to-1 gluten-free baking flour blend.
Cocoa powder: Adds that subtle chocolate flavor. Use unsweetened cocoa for the true red velvet taste. If you only have Dutch-processed, the color might be darker but it still works well.
Red food coloring: The star for that vibrant red color. You can find liquid, gel, or powdered forms. Gel tends to be more concentrated, so use less. If you prefer natural, try beet juice but color intensity may vary.
White vinegar: This reacts with the baking powder to make the cake light. It also helps enhance the red color. You can swap it for lemon juice, though the flavor will be slightly different.
Milk and oil: Milk keeps it moist while oil makes the texture tender. Use any milk you like—dairy or plant-based works fine. Vegetable oil can be replaced with melted coconut or another neutral oil.
Cream cheese frosting or vanilla ice cream: These toppings add creaminess and balance the cake’s slight cocoa bitterness. For dairy-free options, try vegan cream cheese or non-dairy ice cream.
How Do You Avoid Overcooking the Mug Cake in the Microwave?
Microwaves cook fast but unevenly, so there’s a risk of drying your mug cake.
- Use a microwave-safe mug that holds about 12 oz to give the batter space to rise without spilling.
- Cook on high power but start checking around 1 minute. Microwave times vary a lot, so check in 10-second bursts if unsure.
- Stop cooking when the cake looks set and springs back lightly with a finger. A toothpick inserted should come out clean.
- Let the mug cake sit for a minute after microwaving. It continues cooking slightly in the mug and firms up a bit.
Patience here will help you get a fluffy, moist cake without any rubbery edges!
Equipment You’ll Need
- Microwave-safe mug – Perfect size to mix and cook your cake all in one dish.
- Small whisk or fork – Great for quickly blending ingredients without lumps.
- Measuring spoons – Help you get the right amounts of small ingredients like baking powder and vanilla.
- Microwave – The fastest way to cook your mug cake in just a minute or two.
Flavor Variations & Add-Ins
- Try adding chocolate chips for extra gooey bites that melt into the cake.
- Swap cream cheese frosting with peanut butter spread for a nutty twist.
- Mix in a handful of fresh raspberries for a fruity contrast to the cocoa.
- Use almond extract instead of vanilla for a subtle, sweet flavor change.

How to Make Red Velvet Mug Cake?
Ingredients You’ll Need:
- 4 tablespoons all-purpose flour
- 2 tablespoons granulated sugar
- 1 tablespoon unsweetened cocoa powder
- 1/4 teaspoon baking powder
- A pinch of salt
- 3 tablespoons milk
- 2 tablespoons vegetable oil
- 1/4 teaspoon vanilla extract
- 1/2 teaspoon white vinegar
- 1 teaspoon red food coloring
- Cream cheese frosting or vanilla ice cream for topping
- Optional: red velvet cake crumbs for garnish
How Much Time Will You Need?
This recipe takes about 5 minutes total. It’s super quick to mix the ingredients and just about 1 to 1.5 minutes to microwave. You only need a minute or two to let it cool, then add your favorite topping, and you’re ready to enjoy.
Step-by-Step Instructions:
1. Mix the Dry Ingredients:
Grab a microwave-safe mug and whisk together the flour, sugar, cocoa powder, baking powder, and salt until everything is evenly combined.
2. Add the Wet Ingredients:
Pour in the milk, vegetable oil, vanilla extract, white vinegar, and red food coloring. Stir well until the batter is smooth and all the ingredients are fully blended.
3. Microwave the Cake:
Place the mug in the microwave and cook on high for about 1 minute and 10 seconds to 1 minute and 30 seconds. The cake should rise and be set in the middle. You can test it with a toothpick — if it comes out clean, it’s done! Microwave times can vary, so keep an eye on it.
4. Cool and Top:
Let your mug cake cool for a minute or two since it will be hot. Then, top it with a spoonful of cream cheese frosting or a scoop of vanilla ice cream. For a pretty finish, sprinkle some red velvet cake crumbs on top if you like.
5. Enjoy!
Dig in straight from the mug, savoring your quick and tasty red velvet treat!
Can I Use a Different Type of Milk?
Yes! You can use any milk you have on hand, including dairy-free options like almond, soy, or oat milk. Just keep the amount the same for best results.
What If I Don’t Have Red Food Coloring?
Natural alternatives like beet juice or powdered beetroot can work, but the color may be less vibrant. You can also skip it, though your mug cake will look more chocolate than red velvet.
How Do I Store Leftover Mug Cake?
Mug cakes are best eaten fresh, but if you have leftovers, cover the mug tightly with plastic wrap and refrigerate for up to 1 day. Reheat briefly in the microwave before enjoying.
Can I Make the Mug Cake Without a Microwave?
If you don’t have a microwave, you can try baking the batter in a small oven-safe ramekin at 350°F (175°C) for about 12-15 minutes, but timing may vary.