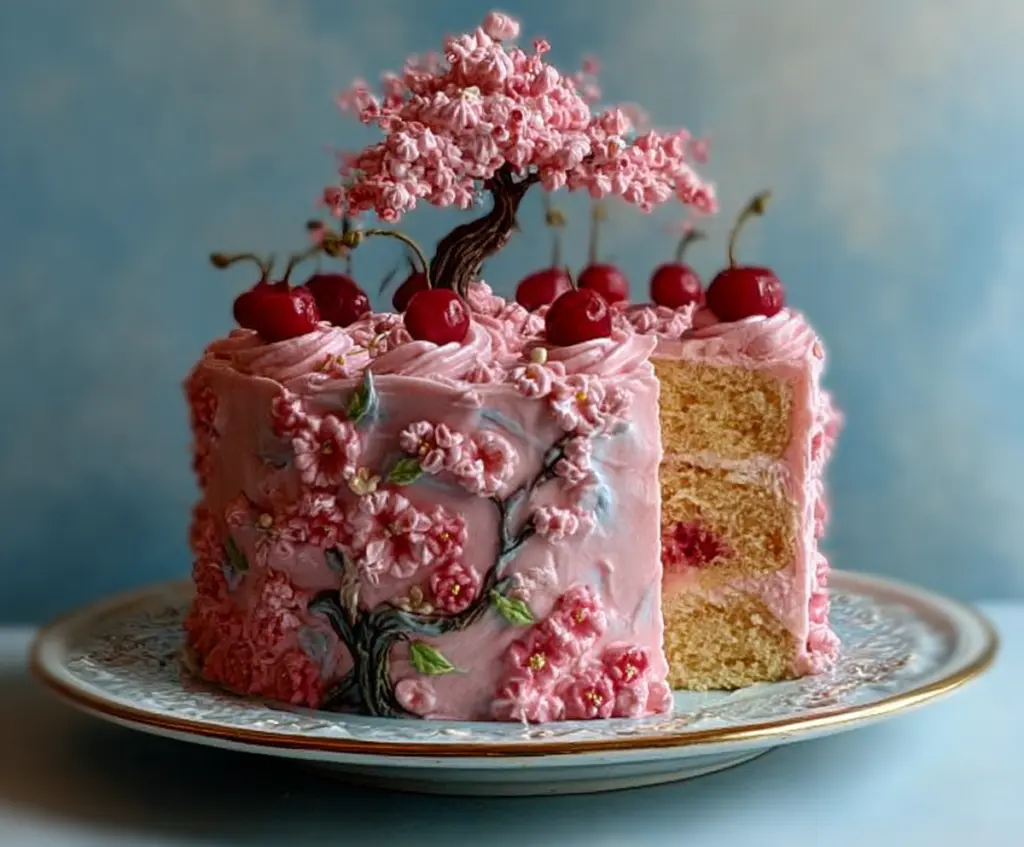
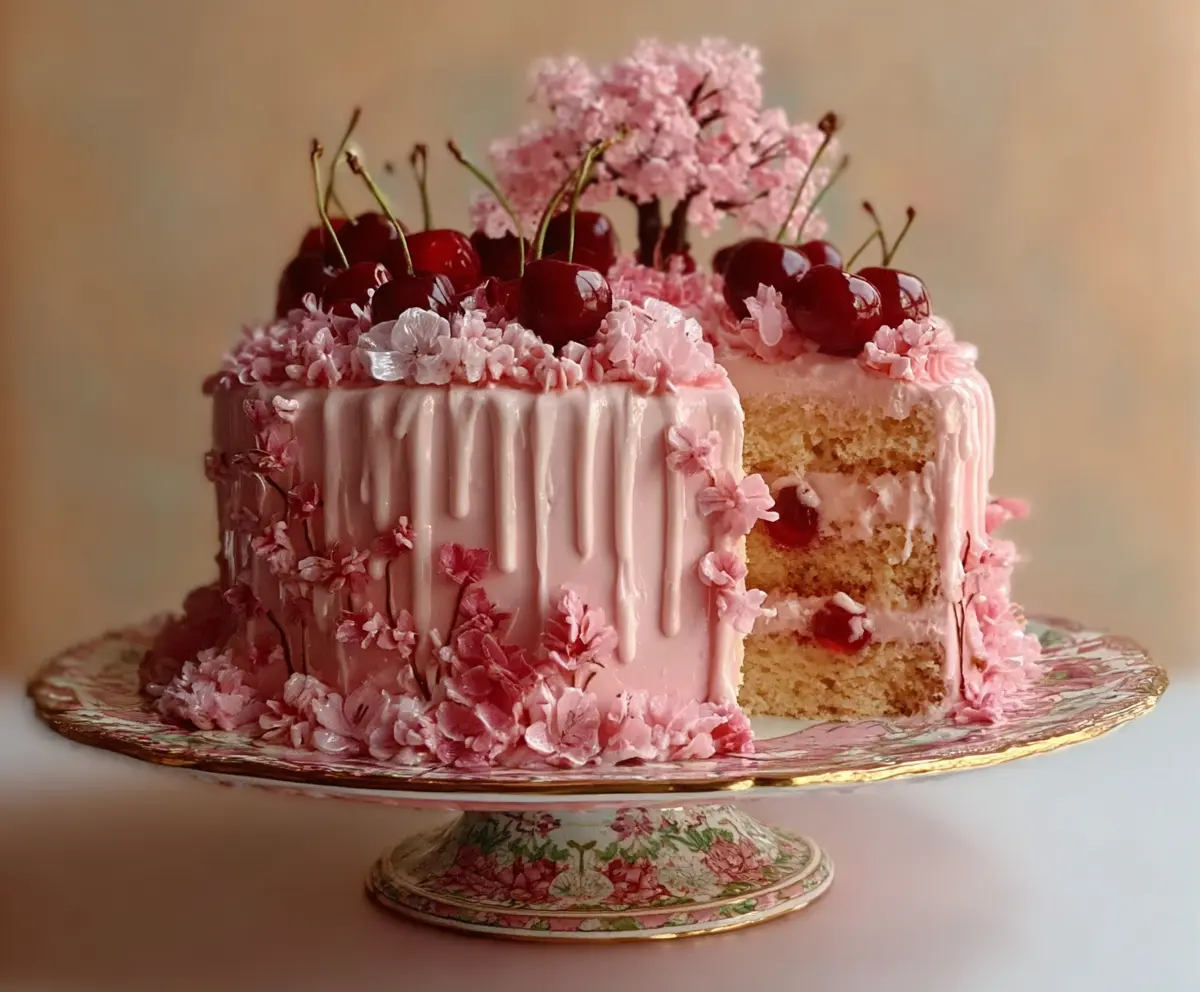
Cherry Blossom Dream cake is a light and lovely dessert that captures the beauty of spring in every bite. It’s made with soft, fluffy layers of cake that are gently flavored and tinted with a soft pink hue, inspired by cherry blossoms. The cake is often topped with a creamy frosting that’s smooth and sweet, making each slice feel like a little celebration of the season.
I love making this cake when the cherry trees start blooming because it feels like bringing a bit of nature indoors. Sometimes, I add a few edible flowers or sprinkles on top to mimic the look of falling petals, which always gets a smile from anyone who sees it. It’s one of those cakes that looks as pretty as it tastes, and I find it’s perfect for sharing with friends during a relaxed afternoon or a cozy family gathering.
What I really enjoy about the Cherry Blossom Dream cake is how it’s not too rich or heavy, which means you can enjoy a slice without feeling weighed down. I usually serve it with a cup of tea or a light fruit drink, and the whole combination just feels so fresh and cheerful. This cake makes good memories even better, whether it’s a special occasion or just a little treat to brighten up your day.
Key Ingredients & Substitutions
- All
- Purpose Flour: This gives the cake structure and tenderness. If you want a lighter crumb, you can mix half all-purpose with cake flour.
- Cherries
- Fresh or frozen cherries work well for the filling. If fresh aren’t available, just thaw frozen and drain excess liquid. You can swap with frozen berries if preferred.
- Butter
- Unsalted butter is best for controlling salt levels. Make sure it’s softened to room temperature for smooth mixing. You can use margarine or plant-based butter for dairy-free options.
- Milk
- Whole milk adds richness, but you can substitute with any milk or plant-based milk like almond or oat for different dietary needs.
- Buttercream Frosting
- Use good-quality unsalted butter for a creamy texture. Adjust the powdered sugar and milk to get your preferred spread consistency. Gel food coloring is great for vibrant color without thinning the frosting.
How Do You Get the Cake Layers Light and Moist Yet Firm Enough to Stack?
The key is in mixing and baking carefully. Here’s what I do:
- Beat the butter and sugar well until fluffy. This traps air for lightness.
- Add eggs one at a time, beating after each for better blending.
- Alternate adding dry ingredients and milk. Mix just until combined to avoid toughness.
- Bake at 350°F and test with a toothpick. Don’t overbake to keep moisture.
- Cool completely before assembling. Warm cakes can make frosting melt.
What’s the Best Way to Thicken Cherry Filling Without It Being Runny?
The cornstarch slurry is essential. Here’s my step-by-step:
- Simmer cherries with sugar and water so they release flavor and juice.
- Mix cornstarch with cold water before adding, so it doesn’t clump.
- Stir into simmering cherries and cook 1-2 minutes until the mixture thickens.
- Remove from heat and cool. Thickens more as it cools, so wait before using.
How Can I Pipe the Beautiful Cherry Blossom Tree Design with Buttercream?
It’s easier than it seems! Follow these tips:
- Use small piping bags for the brown trunk and green leaves to have control.
- Pipe the trunk first using a round or leaf tip to create branches.
- Switch to a star or flower tip for pink blossom clusters—pipe small dots or stars close together.
- Practice on parchment paper before piping on the cake to get comfortable.
- Add edible pearls gently with tweezers so they don’t crush the frosting.
- Chill the cake after crumb coating and before decorating to keep frosting firm.
Equipment You’ll Need
- Two 8-inch round cake pans – perfect for even baking and matching cake layers.
- Mixing bowls – you’ll need a few for dry ingredients, wet batter, and frosting.
- Electric mixer or stand mixer – makes creaming butter and beating frosting quick and smooth.
- Small saucepan – handy for gently simmering and thickening the cherry filling.
- Wire cooling racks – help your cake layers cool evenly and prevent sogginess.
- Piping bags and tips – essential for creating detailed cherry blossom tree decorations with frosting.
- Spatula – great for spreading frosting evenly and scraping bowls clean.
Flavor Variations & Add-Ins
- Swap cherries for raspberries or strawberries in the filling for a different berry flavor that’s equally delicious.
- Try almond extract instead of vanilla for a subtle nutty twist in the cake and frosting.
- Add a handful of chopped white chocolate or toasted almonds to the batter for extra texture.
- Use cream cheese frosting instead of buttercream if you like a tangier, richer frosting to balance the sweet cherry filling.
Cherry Blossom Dream Cake
Ingredients You’ll Need:
For the Cake:
- 2 ½ cups all-purpose flour
- 2 ½ tsp baking powder
- ½ tsp salt
- 1 cup unsalted butter, softened
- 1 ¾ cups granulated sugar
- 4 large eggs
- 1 tsp vanilla extract
- 1 cup whole milk
For the Cherry Filling:
- 1 cup fresh or frozen cherries, pitted and halved
- ⅓ cup granulated sugar
- 2 tbsp water
- 1 tbsp cornstarch diluted in 2 tbsp water
For the Pink Buttercream Frosting:
- 1 cup unsalted butter, softened
- 4 cups powdered sugar, sifted
- 2-3 tbsp whole milk or heavy cream
- 1 tsp vanilla extract
- Pink gel food coloring
For Decoration:
- Fresh cherries with stems (around 8-10)
- Green and brown gel food coloring (for leaves and tree trunk)
- Small edible pearls (optional)
How Much Time Will You Need?
This cake takes about 20 minutes to prepare the batter and filling, 25-30 minutes to bake, plus about 1 hour cooling time. Decorating and assembling will take around 30-45 minutes, plus an additional hour chilling time to let the decorations set. Overall, expect around 3 hours from start to enjoying your delicious cake.
Step-by-Step Instructions:
1. Bake the Cake Layers:
Start by preheating your oven to 350°F (175°C). Grease and flour two 8-inch round cake pans to prevent sticking. In a medium bowl, whisk the flour, baking powder, and salt together. In a large bowl, cream the softened butter and sugar until light and fluffy using a mixer. Add the eggs one by one, beating well after each. Stir in vanilla extract. Now, add the flour mixture and milk alternately into the buttery mixture, starting and ending with the dry ingredients; mix just until combined, don’t overmix. Divide your batter evenly between the prepared pans and bake for 25-30 minutes. To check doneness, insert a toothpick in the center; it should come out clean. Let the cakes cool completely on a wire rack before moving on.
2. Prepare the Cherry Filling:
While the cakes bake and cool, make the cherry filling. In a small saucepan, combine the cherries, sugar, and 2 tablespoons of water. Place over medium heat and bring to a gentle simmer. Stir in the cornstarch diluted in water, and cook for 1-2 minutes more until the filling thickens. Take off the heat and set aside to cool fully.
3. Make the Pink Buttercream:
In a large bowl, beat the softened butter on medium speed until creamy. Gradually add the sifted powdered sugar, one cup at a time, starting on low speed to avoid sugar clouds. Add vanilla and 2 tablespoons of milk or cream, then beat on medium speed until fluffy. If the frosting is too stiff, add more milk a little at a time to reach spreadable consistency. Add pink gel food coloring and mix until you get the soft cherry blossom pink shade you want.
4. Assemble the Cake:
If necessary, level your cake layers using a serrated knife to create even tops. Place the first cake layer on your serving plate or cake board. Spread a layer of pink buttercream evenly over it. Add a spoonful or two of your cooled cherry filling in the center of the cake, leaving a border of frosting along the edges. Carefully spread a second thin layer of buttercream over the cherries to encase the filling. Place the second cake layer on top. Cover the entire cake with a thin crumb coat of buttercream to seal crumbs in, then chill in the fridge for 20 minutes to set.
5. Decorate the Cake:
Once chilled, apply a final smooth layer of pink buttercream all over the cake. Using a piping bag fitted with a star tip, pipe pretty rosettes all around the top edge. Place fresh cherries with stems atop each rosette for a fresh accent. Using buttercream tinted brown, pipe the tree trunk on the side of the cake. Add green buttercream leaves and then pipe pink blossoms on the branches with small star or flower tips. For a charming touch, scatter edible pearls among the blossoms. For an eye-catching centerpiece, pipe a 3D cherry blossom tree on top by creating clusters of pink blossoms with a brown trunk and branches in the center.
6. Serve and Enjoy:
Place the decorated cake in the fridge for about an hour to set the decorations nicely. When ready, slice carefully and serve the moist vanilla cake layered with sweet cherry filling and topped with smooth pink cherry blossom buttercream. Enjoy every delicious bite!
Can I Use Frozen Cherries for the Filling?
Yes! Just make sure to thaw them fully and drain any excess liquid before cooking to avoid a runny filling.
How Should I Store Leftover Cake?
Store leftovers in an airtight container in the refrigerator for up to 3 days. Let the cake come to room temperature before serving for best flavor.
Can I Make This Cake Ahead of Time?
Absolutely! Bake the cake layers and prepare the cherry filling a day ahead. Assemble and decorate on the day you plan to serve for the freshest look and taste.
What If I Don’t Have Gel Food Coloring?
You can use liquid food coloring, but start with small amounts to avoid thinning the frosting too much. Gel coloring gives the best vibrant pink without affecting texture.